Content Workflow
Content Workflow
This post contains the common used workflow for the update of posts contents and how it is commit to the remote repository.
Table of Contents
- Welcome
- Info & Docs
- GitLabCI
- GitLab User or Group Pages
- Customization
- Remove Fork Relationship
- Troubleshooting
Welcome
- This is the readme file with common instructions on how to delpoy a blog site with jekyll in Gitlab pages.
- This site was constructed using jekyll by the user:
 Z37
Z37
- All content is written in english
 and some in spanish
  .
.
Information and Documentation
-
 Example jekyll website using GitLab Pages.
 -
 For more advanced and specific topics visit the GitLab Pages documentation at https://pages.gitlab.io.
GitLab CI
This project’s static blog is built by GitLab CI, following the steps
defined in .gitlab-ci.yml:
# requiring the environment of Ruby 2.3.x
image: ruby:2.6

# add cache to 'vendor' for speeding up builds
cache:
  paths:
    - vendor/

before_script:
  - bundle install --path vendor

# add a job called 'test'
test:
  stage: test
  script:
    - bundle exec jekyll build -d test/
  artifacts:
    paths:
      - test # generating site folder to be browsed or download
  except:
    - master # the 'test' job will affect all branches expect 'master'

# the 'pages' job will deploy and build your site to the 'public' path
pages:
  stage: deploy
  script:
    - bundle exec jekyll build -d public/
  artifacts:
    paths:
      - public
  only:
    - master # this job will affect only the 'master' branch
GitLab User or Group Pages
To use this project as your user/group website, you will need one additional
step: just rename your project to namespace.gitlab.io, where namespace is
your username or groupname. This can be done by navigating to your
project’s Settings.
Read more about user/group Pages and project Pages.
Customization
To work and add content with this project inside Gitlab, you’ll have to follow the steps below. Adding content depends on what is the addition made, like a new page, post or graphical content. Below is the general structure of the workspace of the files and folders that englobe the whole blog site.
├── name_of_PARENT_FOLDER
|   ├── _includes -------------------------------------- Blog site folder with files of footer,head,header *.html.
|   ├── _layouts --------------------------------------- Folder which with the layout for the pages/post of the site.
|   ├── _posts/---------------------------------- This folder is where your posts are.
|   |	|   ├── yyyy-mm-dd-name-of-post.md ------ Sample post name syntax form.
|   ├── _sass ----------------------------------- sass files, containing sass syntax, to format the layout of the site.
|   |	├── _base, _layout, _syntax...*.scss ---d scss files.
|   ├── _css ------------------------------------ Main css file.
|   |	├── main.css----------------------------- This is the css file for the blog site style.
|   ├── layout
|   |	├── default.html-------------------------------- This is the default layout for the pages of the blog site.
|   ├── _config.yml ------------------------------------ The configuration settings for the site.
|   ├── .gitignore ------------------------------------- git .gitignore file.
|   ├── .gitlab-ci.yml --------------------------------- Gitlab configuration file for Gitlab CI/CD pipeline.
|   ├── about.md --------------------------------------- The about blog site page.
|   ├── feed.xml --------------------------------------- Feed xml file.
|   ├── Gemfile ---------------------------------------- A list of gem dependencies.
|   ├── index.html ------------------------------------- Index main page.
|   ├── README.md -------------------------------------- Read file documentation for the blog site construction.
|   ├── Resume.md -------------------------------------- The resume blog site page.
The branch used in this case is always the master branch.
- First add some content.
- Commit the changes to the master branch; add comments to necessary updates.
- To preview the project waith for the pipelince to finish on the CI/CD Pilelines of the gitlab project.
- Once the pipeline has passed, visit youe new blog site at the pulished gitlab pages site, which might be ```https://user_name.gitlab.io``
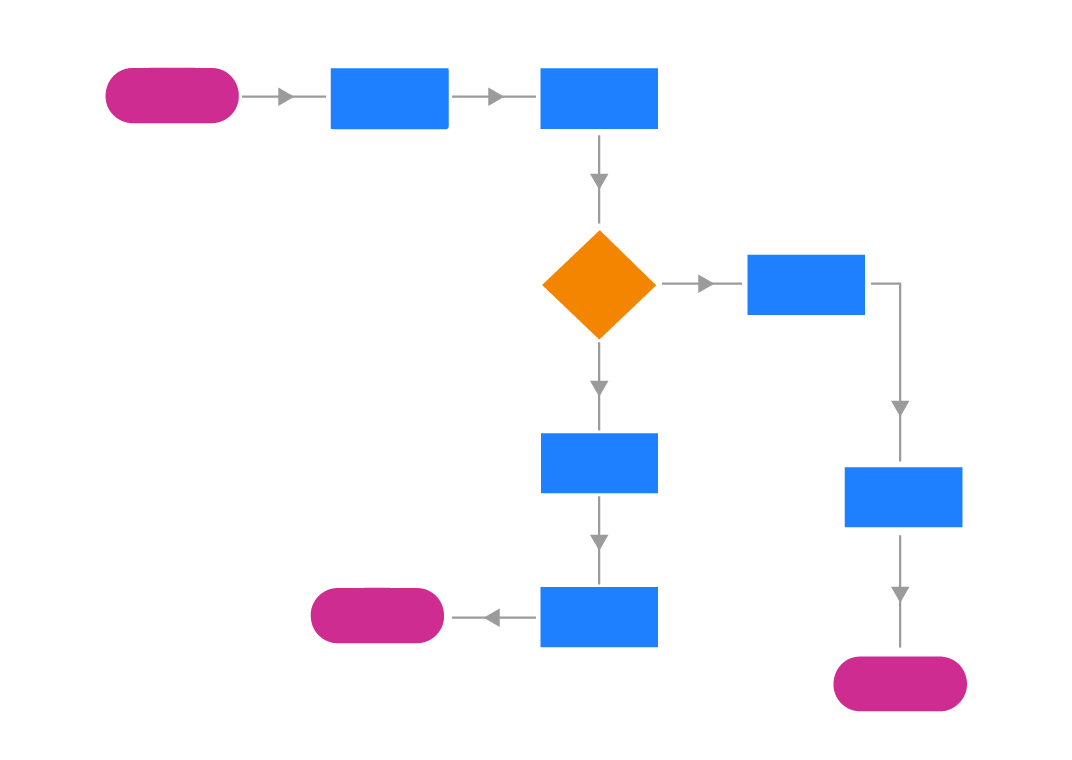
The basic workflow is shown below:
The basic workflow is shown below:
Gantt Diagram
Remove Fork Relationship
If you forked this project for your own use, please go to your project’s
Settings and remove the forking relationship, which won’t be necessary
unless you want to contribute back to the upstream project.
Troubleshooting
- CSS is missing! That means two things:
- Either that you have wrongly set up the CSS URL in your templates, or your static generator has a configuration option that needs to be explicitly set in order to serve static assets under a relative URL.